Transitioning from a beginner to a successful photographer is a lengthy journey. The learning process starts with mastering fundamental photography skills such as camera handling, capturing photos with a suitable composition, and excelling in post-processing editing.
It’s beneficial to familiarize oneself with basic photography skills in the early stages. This includes understanding photography vocabulary and the primary facets of the craft. Continuous learning and consistently practicing these essential skills become invaluable as you progress. So, what are these foundational photography skills that every beginner should learn?
Basic photography skills to know before taking photos
First and foremost, mastering your fundamental camera skills from “head to toe” is the essential knowledge you need before taking pictures. Even if you have the best camera, if you’re unsure about its operation or the functions of various buttons, you won’t achieve your ultimate goal: producing high-quality photos.
Camera Handling and Buttons
Before diving deep into photography and editing, begin with the basics. Understand the function of each button and how they can enhance the quality of your photos. Search for tutorials on YouTube or Google that delve into the specifics of your current digital camera. Look for reviews, like the one I did for the Canon M50.
Familiarize yourself with different shooting stances. Pay attention to your shoulder positioning and learn to control your breathing when you aim and shoot.
Explore the options in your camera’s menu, acquaint yourself with basic photography terminology, and become comfortable with your camera overall.
Understanding the Main Aspects of Photography
First, familiarize yourself with the shutter speed, ISO, and aperture. Afterward, delve into the essential photography skills, understanding how these elements work in tandem and how adjustments in one aspect can influence the overall quality of the photo.
Shutter Speed
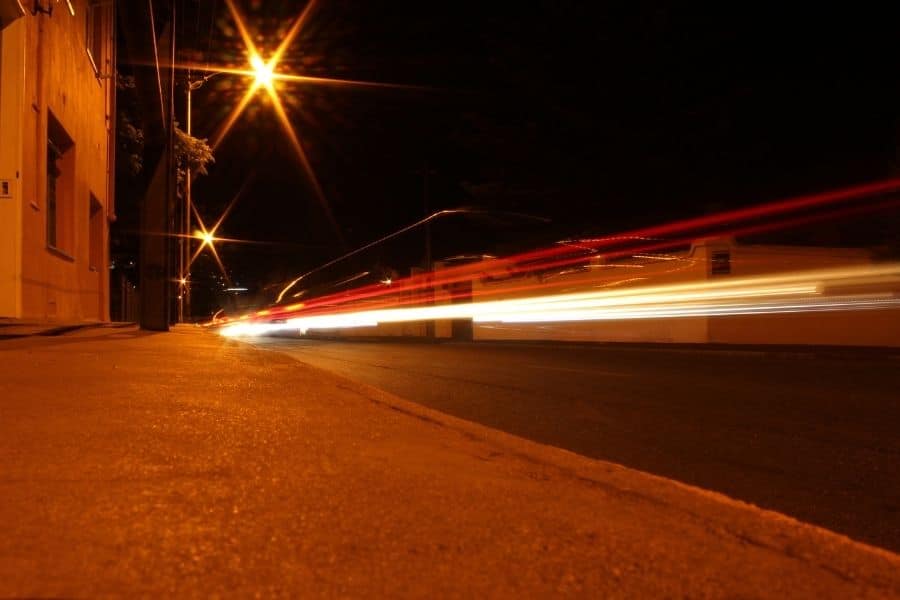
Shutter speed refers to the duration the camera shutter remains open. It dictates how long the camera takes to capture a photo, ranging from slow to fast, resulting in effects from motion blur to sharp images.
Shutter speeds can range from mere milliseconds to as long as half a minute. For instance, if you photograph a moving car with a longer shutter speed, like 2 seconds, the result will exhibit motion blur, rendering the image less sharp. Conversely, setting the shutter speed to the fastest milliseconds will allow you to capture a crisp image of the moving car, devoid of motion blur.
ISO
ISO is one of the three primary camera settings that can brighten or darken your photo. Typical ISO values range from 100 to 3600. ISO 100 represents the lowest and darkest setting. As the ISO value increases, the brightness of the photo does as well. For instance, ISO 200 is twice as bright as ISO 100.
The shooting conditions determine the appropriate ISO number. Are you shooting on a bright sunny day or during low-light twilight? While most cameras will adjust the ISO level automatically, it’s essential to understand how these values impact your photos. For instance, a higher ISO number tends to introduce more color noise.
Aperture
Aperture
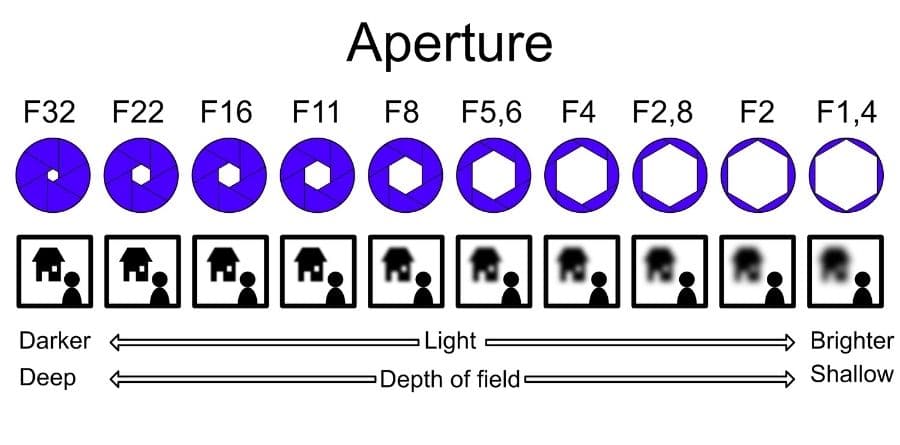
Aperture refers to how open your camera is to light, and it significantly affects the brightness of the photo. It is measured in f-values, ranging from lower values like f/1.4 to higher ones like f/16. A lower f-value (e.g., f/1.4) indicates that your camera is more open to light, while a higher value (e.g., f/16) suggests the opposite. Thus, a lower f-number means more light and brightness.
Another effect of the aperture is the depth of field, which also depends on the f-value. A lower number results in a shallower depth of field. For instance, if you’re taking a portrait and want to focus on the subject (like a person) while blurring the background, you’d use a lower f-value (between f/1.4 to f/4). Conversely, for landscape photos where clarity across various distances is desired, you’d opt for aperture values like f/12 to f/16.
Remember, the aperture also influences the overall brightness of the photo (a lower number allows more light into the camera), so adjustments are necessary.
Essential Photography Skills for Capturing Photos
Now that you’re acquainted with key photography concepts, camera handling, and button functions, it’s time to delve into the core of photography: capturing professional images. This journey involves a comprehensive learning process with numerous facets to master.
Manual vs. Automatic Shooting
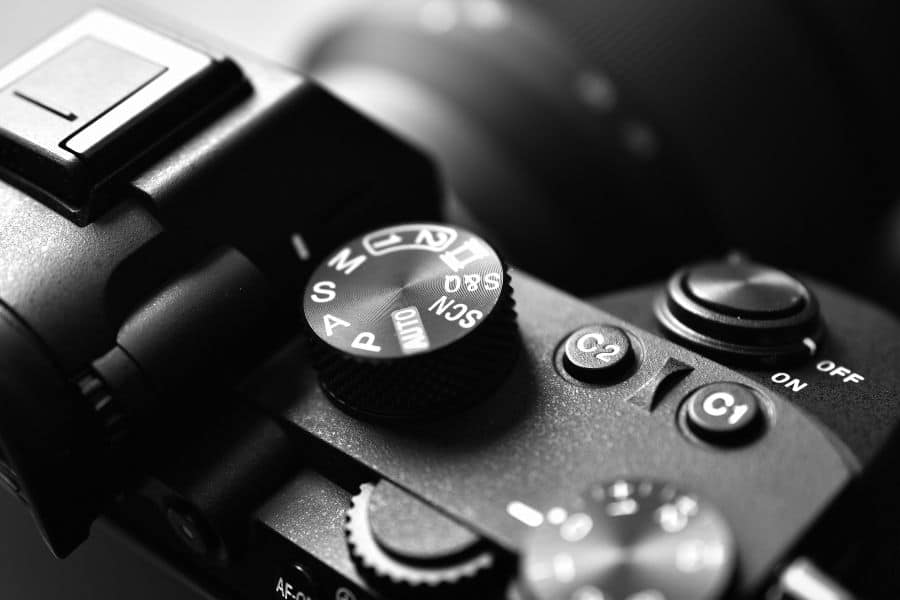
Typically, cameras have a mode dial (usually on top) that lets you select various settings for photos or videos. Several automatic modes are tailored for specific scenarios, such as night shots, portraits, landscapes, and macros. These are handy for casual shooting without a focus on skill development.
However, if you’re keen on honing your craft, you should avoid automatic settings. Familiarizing yourself with the interplay of shutter speed, aperture, and ISO and practicing manual shooting will significantly enhance your skills over time. Begin with aperture priority (Av) and manual mode (M).
Focusing
In photography, focusing primarily ensures that the subject of your photo is sharp. For instance, in portrait photography, the primary plane of focus should be the person, ensuring they stand out clearly.
Modern cameras come equipped with advanced autofocus systems, a boon for beginners. Features might include face-tracking, zone, or one-point autofocus. In many scenarios, even seasoned photographers rely on autofocus for its convenience.
However, manual focus becomes indispensable in challenging conditions like low-light settings. In such situations, autofocus might struggle to lock onto a subject. That’s when you’ll need to set the focus manually.

Understanding Depth of Field
In essence, depth of field refers to the specific area in front of the camera where the focus is set, making objects appear sharp. Consider an example where two people are photographed: one is 2 meters away from the camera, and the other is 4 meters away. Suppose the camera is set to a wide aperture (f/2) and focuses on the person 4 meters away; the depth of field centers around that distance. In this scenario, the person 4 meters away will appear sharp, while the one 2 meters away will appear blurry.
Lighting Conditions
Lighting is among the foundational photography skills that beginners should prioritize. Initially, many photos may be compromised due to poor lighting. For instance, in low-light conditions, images might turn out blurry because of extended shutter speeds. On the other hand, highly bright days can result in overexposure.
Learn more: How to avoid overexposure skies!
How to Understand Exposure
Exposure
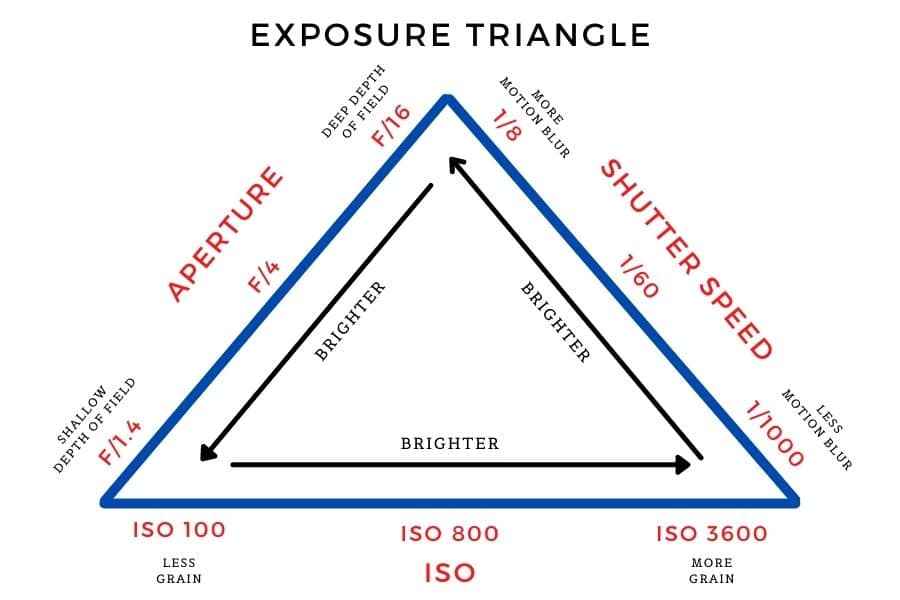
Exposure refers to the amount of light that enters your camera. It’s closely related to the three primary aspects of photography we discussed earlier: shutter speed, aperture, and ISO. Before delving deeper into this topic, it’s crucial to understand how these three elements interact.
This interplay is often termed the “exposure triangle.” Each of the three main components influences the brightness of the image.
The ultimate objective is to capture a photo with the correct exposure.
White Balance
White balance is a pivotal concept in digital photography, closely tied to color temperature. To grasp this, it’s essential first to recognize the different color temperatures in photography. You’re likely aware that cooler colors have a bluish tint, while warmer colors lean towards reds and yellows.
Sometimes, due to varying lighting conditions (both indoor and outdoor), photos may appear excessively blue or overly yellow — resulting in hues that don’t align with what our eyes naturally perceive. This discrepancy is especially noticeable in portrait photography.
To counteract these unnatural tones, we introduce the opposite color temperature, a process known as white balancing. This adjustment can be made directly on the camera or later during post-processing.
Composition in Photography
Composition in photography is all about directing the viewer’s attention to the key elements within an image. Whether it’s the “leading lines,” blurred sections, or any other standout feature, the aim isn’t always to create an aesthetically pleasing photo. Instead, the emphasis is often on conveying a deeper meaning or story.
Composition in Portrait Photography

In portrait photography, the primary subject is the person being photographed. Essential rules for portrait composition include ensuring the individual stands out from the background, focusing on the eyes, and selecting an appropriate background for the image.
To make a person stand out from the background, one can achieve this by selecting the right depth of field, typically using a wider aperture. This ensures the subject appears sharp while the background remains blurred.
The eyes are the most critical element in portrait photography. It’s essential to direct your focus towards them. The closer the portrait is taken, the more evident the significance of focusing on the eyes becomes.
When considering the background, it’s best to opt for minimal details. The background should be less captivating than the subject to ensure the person remains the focal point.
Learn more: Portrait composition tips.
Composition in Landscape Photography
One of the most common and straightforward composition techniques is the rule of thirds. In this method, you divide a photo into nine equal rectangles using grid lines. The objective is to position key elements along these horizontal lines or at their intersection points. It emphasizes strategic placement and simplicity.
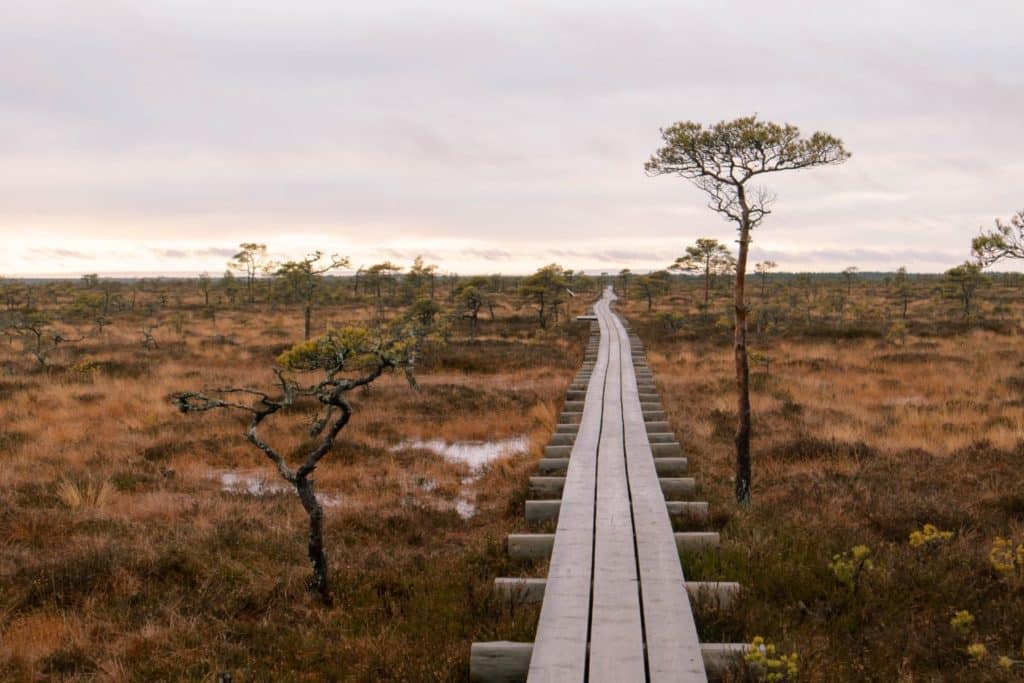
Another prevalent compositional technique is the use of leading lines. These elements within a photo guide the viewer’s eye through the image. Whether it’s a path, a shadow, a hedge, or a framing detail, it serves as an entry point, drawing attention throughout the photograph.
Negative space is yet another simple composition technique. In this case, the primary subject captures the viewer’s attention, while the surrounding area merely fills the frame.
Learn more: Landscape composition tips.
Experimenting with Photography Composition
Naturally, there are myriad ways to compose your images. This can involve playing with diverse colors, using unconventional elements as focal points, and much more. There’s no single solution to composition in photography. Experimenting with photographic techniques across various settings, such as urban landscapes, nighttime scenes, and nature photography, is also beneficial.
Post-Processing Editing
Once you’ve captured your moments, the next step is post-processing editing. Some images might be under-exposed, others may have parts that require color grading, and so forth. Virtually every picture you see from photographers has undergone some form of editing in software.
Photo Editing
For instance, before uploading an original image to Instagram, it might undergo adjustments like increased saturation for more vibrant colors, enhanced clarity, and brightness. Similarly, professional photographers often use specialized editing software to refine their shots.

Different Software
The most widely used editing software includes Adobe Photoshop and Lightroom. While both are employed to enhance images, akin to the edits seen on Instagram, they offer a broader range of features.
How to Edit
Within Lightroom, there are various buttons and sliders designed for image correction. While you might not need to use every tool, understanding the purpose of each adjustment is beneficial. A valuable tip for photo editing is to approach it methodically. Start with basic photo corrections, adjust colors, and finalize your edits. This process will help you hone your digital photography skills.
Photo Correction
Begin by correcting the image. Refrain from adjusting the color grading sliders initially. First, assess the exposure, adjust the white balance, examine shadows and highlights, and add clarity if necessary. Experiment with the tone curve, the primary tool for adjusting highlights and shadows.
Color Grading
Once the image’s brightness and overall appearance closely resemble what the human eye perceives, it’s time to consider color adjustments. Start with the tone curve and modify the three primary colors: red, green, and blue. It might seem intricate initially, but you’ll become more proficient with experimentation and practice. Beneath the tone curve, you’ll find color grading sliders for each primary color. Adjust these to ensure the hues appear natural.
Finishing

Once the primary adjustments are made, it’s time to finalize the editing. This includes removing unwanted elements from the photos, using a vignette to draw attention to the main subject, reducing noise, and ensuring that key components are sharp. For instance, check how prominently the eyes stand out when editing a portrait. This can be easily enhanced using radial filters to target specific areas, such as increasing the brightness and clarity of the eyes.
Continuous improvement through practice
Every budding photographer must begin somewhere to develop their skills. Start with foundational concepts like understanding the exposure triangle, mastering camera handling, and familiarizing yourself with its buttons. From there, consistent practice is the key to evolving as a photographer.
Carry your camera everywhere, capture photos regularly, learn from missteps, apply new photography techniques, experiment with various compositions, and become proficient in post-processing software. With dedication and the application of acquired knowledge, these newly developed photography skills will elevate any photographer to greater heights.
PIN IT

More about photography skills: